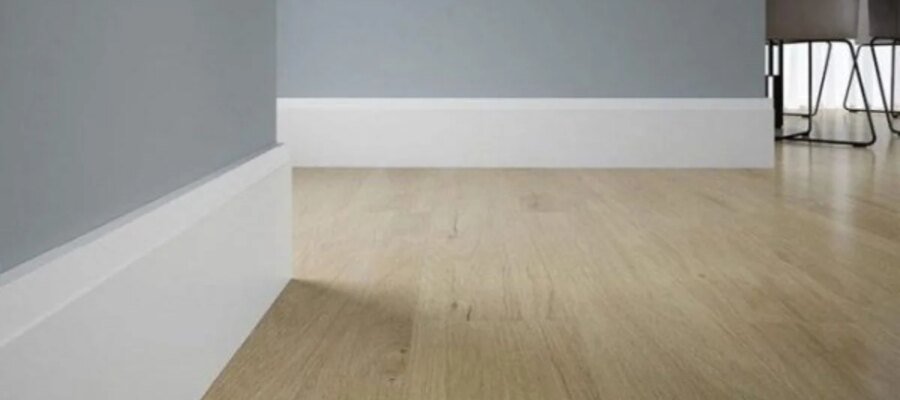
Installing a skirting board is one of the most important steps to finishing a space with beauty and harmony. The skirting board, in addition to protecting the walls, gives the finishing touch to the decoration and gives a refined air to the spaces. Among the most modern and practical options on the market is Arquitech skirting, known for its quality, resistance and ease of application.
In this complete guide you will learn how to correctly install Arquitech skirting boards, with simple and direct instructions that guarantee a professional result, even if you have never done it before. Through the content you will understand what tools are needed, how to make the cuts correctly, the right way to apply glue and fix the pieces, as well as know the care that prolongs the life of the skirting board. The text follows an explanatory and welcoming style, ideal for those who want to learn in a practical and safe way.
And, of course, we mention the Rodapé Shop blog, where you can find other useful tips on installation, maintenance and product choice, and the shop’s website, where you can purchase all the items needed for installation.
What is the Arquitech footer and why choose this model
The Arquitech skirting board is made of 100% virgin polystyrene, a resistant, lightweight material with an excellent finish. This type of skirting is ready to use, requires painting in many cases, and offers a smooth white finish that complements many decor styles. It can be used in living rooms, bedrooms, corridors and even in humid environments such as bathrooms and laundry rooms, as it is resistant to moisture. Another great advantage is the simplified installation.
The Arquitech skirting board has been designed to be applied with specific fixing systems, such as ARQUITECH FIX, which facilitates fixing to the wall without the need for visible screws. The result is a clean installation, with a flawless and durable finish. Plus, the material is eco-friendly and recyclable, making it a sustainable option for those looking to combine design and environmental responsibility. Its durability and scratch resistance also guarantee excellent long-term value for money.
Tools and materials required
Before starting the process, it is essential to separate all the tools and materials that will be used. Organization avoids errors, saves time and makes work easier. Consult the list of what you will need to learn how to install the Arquitech skirting board correctly:
- Arquitech foot in the desired size;
- Special glue for skirting boards (preferably from the Arquitech line);
- ARQUITECH FIX fixing system (specific bushings and nails);
- Tape measure and pencil for marking;
- Miter saw (for straight and angled cuts);
- Drill and masonry drill;
- Rubber hammer and mallet;
- Spirit level;
- Fine sandpaper or file;
- Wet cloth for cleaning;
- Optional: high-adhesive double-sided tape (for delicate walls, such as plasterboard).
Having all of these items ready before starting the installation makes the process smoother and more efficient.
Wall preparation
Preparing the wall is one of the most important steps. If the surface is not clean and level, the skirting board may not adhere properly, resulting in failure to secure. So, before you get started, follow these guidelines:
- Make sure the wall is dry and free of irregularities;
- Remove any residues of paint, dust or grease;
- If there are holes or imperfections, correct them with leveling compound and sand gently;
- Check with the level that the base of the wall is aligned with the floor.
This initial care ensures that the Arquitech skirting board has a firm and uniform hold.
Measure the space and mark the cuts
Correct measurement is essential to avoid waste and ensure a perfect fit between pieces. Use the measuring tape to measure each section of the wall and mark the measurements directly on the back of the baseboard bars. In the internal and external corners it will be necessary to make cuts at an angle of 45 degrees, which guarantee an elegant and discreet finish. Use a miter saw to make these cuts precisely. Always check that the edges are smooth and, if necessary, use fine sandpaper to remove burrs.
Make cuts correctly
Cutting Arquitech skirting is a simple process, but it requires attention. Polyester is a lightweight and easy to work with material, however it is important to ensure clean, well-aligned cuts. Watch step by step:
- Support the skirting bar on a solid, stable surface.
- Mark the cutting line with the help of a pencil and a ruler.
- Use a miter saw for precise cuts, keeping the motion constant and controlled.
- After cutting, use fine sandpaper to eliminate small imperfections.
These precautions prevent the ends from chipping and compromising the appearance of the finish.
ARQUITECH FIX fixing system
The ARQUITECH FIX system is the most suitable method for fixing the Arquitech skirting board to the wall, as it is practical, fast and offers excellent support. Eliminates the use of exposed screws and keeps the finish clean. Follow this procedure:
- Place the skirting board against the wall and mark the points where the holes will be drilled;
- Drill holes in the wall with the drill, using a 6 mm bit;
- Insert the ARQUITECH FIX system bushings into the holes;
- Place the skirting board over the dowels and use the rubber mallet to gently tap it in;
- Finish by tightening the appropriate nails with the help of pliers, without damaging the surface of the skirting board.
This system allows you to keep the skirting board perfectly aligned and firm, as well as facilitating its future removal in case of maintenance.
Application of glue and fixing of the skirting board
In addition to the fixing system, the use of glue is essential to guarantee complete adhesion of the skirting board to the wall. Apply two lines of glue to the back of the bar, running along its entire length. After applying the glue, carefully place the baseboard on the wall and press firmly. Tap lightly with the rubber mallet to adjust the fit and make sure the piece is level. If excess glue comes out of the sides, wipe it off immediately with a damp cloth. Avoid leaving residue as it can harden and damage the final finish.
Finishing of corners and seams
In the corners and seams between two bars it is important to pay attention to the finishing. The joints must always be made with 45 degree cuts, applying a small amount of glue to the ends so that they are well joined. Avoid using PVA caulk or similar materials to fill gaps, as this type of material can crack over time. To join the pieces together and guarantee a long-lasting result, polyurethane glue or the special Arquitech glue is sufficient. After finishing all the seams, use your finger or a putty knife to level off the excess and ensure a smooth joint.
Post installation care
After installing the entire Arquitech skirting board, it is important to respect the drying times of the glue before carrying out any cleaning or placing the furniture near the wall. Typically, the full curing time is 24 hours. During this period:
- Avoid impacts on the bars;
- Do not apply water or cleaning products;
- Do not attempt to remove the socket to reposition it.
After curing, the skirting will be fully set and ready to be cleaned as normal. Use only a damp cloth and neutral soap.
Additional installation tips
To make the process even more convenient, check out some additional tips:
- Store the skirting boards in a flat and ventilated place before installation, avoiding deformations;
- Never hit the skirting board directly with a normal hammer: always use a rubber mallet;
- On plasterboard walls, prefer to use double-sided tape and glue, avoiding dowels;
- If you want to paint the baseboards, use water-based paint and a compatible primer base;
- Avoid direct exposure to the sun, as excessive heat can cause small dilations.
These simple measures guarantee that Arquitech skirting boards maintain their appearance and resistance for many years.
Advantages of Arquitech skirting installed correctly
When skirting is installed correctly the result goes beyond aesthetics. Discover some of the advantages:
- Protects walls from impacts and dirt;
- Facilitates cleaning and maintenance of the environment;
- Enhances the decoration, giving a professional finish;
- It resists humidity and does not rot;
- It can be removed and reinstalled if necessary.
These benefits make Arquitech skirting boards a smart choice for homes, offices and commercial environments.
Our commitment to you
We at Rodapé Shop work with the best products on the market to ensure the finish of your space is flawless. On our official website you will find various models of skirting boards, glues, tools and accessories for Arquitech installation. And if you want to know more about decoration, renovation and installation, the Rodapé Shop blog is the right place to find tutorials, advice and exclusive news.

Photo: reproduction
Conclusion
Learning how to install Arquitech skirting is easier than it seems, especially when you have the right information. By following the instructions in this guide you will be able to carry out the installation safely, practically and with a finish worthy of a professional.
The key is preparation: measure well, cut precisely, apply glue correctly and respect curing times. With these measures your Arquitech skirting board will beautify the environment and will remain perfect for a long time.
Frequently Asked Questions (FAQ)
Is it possible to install Arquitech skirting boards on plasterboard walls?
YES. In this case the ideal is to use glue and high-strength double-sided tape, avoiding dowels and nails, so as not to damage the plasterboard.
Can I paint Arquitech skirting boards after installation?
You can, but it’s not mandatory. Comes with a ready-made white finish. If you want to change the color, use water-based paint and apply a primer.
What is the best glue for installing Arquitech skirting boards?
The recommended glue is Arquitech glue, developed specifically for this type of material. Provides firm adhesion, quick drying and a clean finish.
latest posts published

Necessary accessories for a perfectly functioning terrace
Ancient wood sources for authentic projects

Tips for choosing an electric scooter

How do we preserve fruit and vegetables for the winter?

For a cleaner home: choose the most suitable vacuum cleaner!
Special carpets for spaces with heavy traffic
How to install LVT on steps with rounded edges
Design trends for colored rubber flooring
Antibacterial linoleum: safe option for schools and hospitals